search

Thursday, June 27, 2013

'Cars' Inspired-Series!

'Cars' Series: Fillmore the Hippie Van!
Hello everyone!
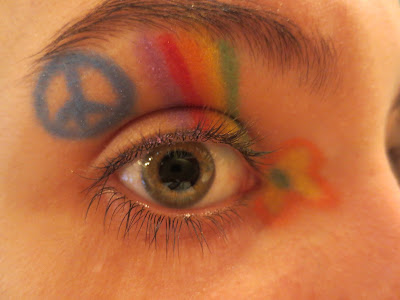
I wanted to start a series again, and this time the looks are inspired by the movie 'Cars!' I was watching it, and was so so happy, because, all of the characters were so extremely different in color and design! :D The first look in the series is inspired by Fillmore, the hippie van. As soon as he came on screen, I knew I wanted to do a look with his fun designs and colors. I added a tutorial, but it isn't as detailed as my past ones. Be prepared; this look is crazy! Here it is:


Told ya it was crazy! XD
Tutorial:


I think that sometimes I might just put the steps only in pictures, and not writing. Let me know if you like it that way! :D <Lucy


Wednesday, June 19, 2013

Leopard Eye! :D

Leopard Eye! :D
I was SO happy with how this crazy leopard look turned out! :D It did take about an hour to do, but it was so fun at the same time. I made a tutorial for you all too! :) Here it is:


(The lip color I used looks coral-y in the pic, but its really a shimmery purple-ish magenta!) ;)
Tutorial:
 Prime with Urban Decay Primer Potion in Original.
 Apply a thin layer of Maybelline Color Tattoo Metal in Barely Branded all over the upper eye area.
 Set it with a matte beige eyeshadow.
 With Elf Cream Eyeliner in Black, start to randomly place shapes like this. (I used a bent liner brush from Elf to apply the liner).


 Spread the shapes all across the eye.
 Darken the black lines by adding more liner.


 Set all of the shapes with black eyeshadow: I used Makeup Geek's Corrupt.
 Put some medium brown eyeshadow in the middle/side of each shape. (I used MUG's Latte, and a tiny bit of Mug's Cocoa Bear).
 Start to add a little of Elf Glitter Liner in Copper to all of the shapes.

 Apply a very thin, winged out line of Elf's Black Liquid Liner.
 Smudge L'Oreal Pencil Perfect Eyeliner in Ebony on the lower lashline.
 Add the pencil to the waterlines.

Sweep on a good few coats of mascara, and you done! (I decided not to do falsies, but if you want to add some, try adding wispy, long ones. :)
The finished look:
For the lips, I used a lip color from the Sephora Limited Ed. Kit.
I hope you like this look as much as I did! See you soon for another crazy look! :D <Lucy <3

Friday, June 14, 2013

Crazy and Dramatic Welcome Back Look!

Crazy and Dramatic Welcome Back Look!
Ok, so I did have an idea for a look today! :)> This CRAZY look is dramatic, with falsies, and some gold glitter! I also made a pictorial for you! The look:

 The glitter started to wear off! :o
 As you might have noticed, the little gold things in my lashes that I attached aren't perfect. That's because I'm not very good at falsies in general, so it took about a half hour to get the little gold strips on!  And because the falsies were so long, that I couldn't see what I was doing the whole time, so it took several attempts! ;)
Tutorial:
 Prime with the Urban Decay Primer Potion in Original.
 For a base, take Elf Jumbo Eyeshadow Stick in Midnight Rendezvous.
 Apply it to the lid, crease, and slightly above.
 Take Makeup Geek's Eyeshadow in Corrupt with a shader brush like the IL MAKIAGE Fluff Brush.
 Apply Corrupt to lid and crease.
 Blend it with the Elf Eye Blending Brush.
 Add some Corrupt to the lower lashline, all the way in.
 Take any matte eyeshadow that is the color of your skin (I took MUG's Beaches and Cream).
 Take the shadow with a fluffy dome brush, and highlight the browbone.
 Take the Sephora Limited Ed. Makeup Kit, and the gold cream eyeliner.
 Apply a strip of the gold liner down the middle of your eye with your finger.
 Take the NYX Glitter Cream Palette in Bronze Goddess.
 With the Elf Eye Blending Brush, pick up the cool-toned gold (the first) glitter.
 Apply it over the liner.
 This is the beginning of the difficult part: take some thin, plastic gold craft strip, a thick-lashes falsie, and a pair of baby scissors. 
 Put some glue on the lashes, and wait 30 seconds. Then apply them.
 After letting the lashes dry a bit, cut the gold strip into short pieces that are slightly longer (or shorter, or the same length :) ) than the falsies, and attach 3-5 of them. I did three.
 Done with the eyes!
 Oh yeah, black gel liner in the waterlines! ^-^
 The 1st lip color of the middle section of the 1st layer from the Sephora Kit for the lips.
Pretty!
All done! (I was going to do both eyes, but after struggling with the gold strips, I thought 'hey this will look fine with just 1 eye done, right?' :)
Oops, forgot to paint my nails! :o ;)
I hope you are all still there! I hope you have fun with this look! See you soon!<Lucy

Ps. Because of the posting problem, I started a new blog at makeupcrazy1.wordpress.com. I decided to keep both of the blogs, and post on both. I am going to be doing not-so-wearable looks (like this one) on this blog, and on the wordpress blog, wearable looks. I hope you visit the other blog, and I hope you all didn't forget about my blog! :D <Lu